Having a generator available in your home or even in the campsite is a valuable way of keeping the celebrations going. This is applicable more so when there are power blackouts and you need to keep your devices up and running. And for those who own diesel or gas-powered generators, you know they are always very noisy when running and you always want a way to keep their noise levels low.
Due to this little inconvenience, you always place it a little further from the campsite while it runs. This too comes with its share of challenges too, mostly from weather elements. It could be wind, rain, snow or even too much heat.
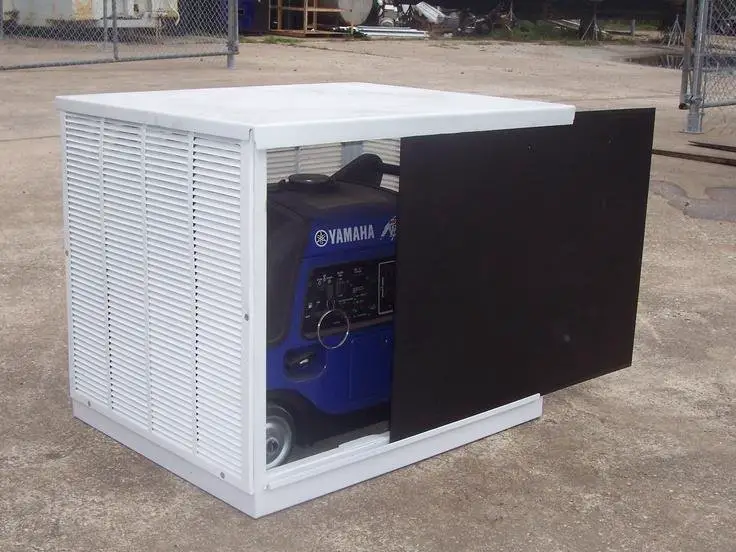
That is why you need a portable generator enclosure to protect it from these generator enemies, particular rain, and storms. In the process, the enclosure can also work as a generator baffle box to keep the noise down.
As a DIY enthusiast, there are certain things you do not have to buy. This generator accessory is one of the numerous options you can build on your own. This article will take you through the various steps to make your generator a safe and silent haven.

Image source: Youtube
Why do you need to enclose your generator?
- Reduce noise levels
Most of the portable generators available are very loud, meaning that you will have to keep them at a distance when using them. By using a baffle box with sound absorbing materials as an enclosure, these sounds are dampened, allowing for quieter operations.
- Protection from weather elements
When you construct a sturdy generator enclosure, it will handle and protect the generator against the various elements Mother Nature will throw at it. Rain, wind, and snow will provide the biggest hindrance to the operational capabilities of your power machine.
An enclosure keeps you and your friends entertained even in winter. No matter how terrible the weather may be outside, the generator will still keep running.
- Anti-theft
Although not often heard of, generator thefts often occur in some places. Therefore, if you happen to leave your generator out in the open, an easy target is created. But when you enclose your generator in a lockable baffle box, it becomes a little harder for thieves to make away with it.

Via Pinterest
- Freeing up storage space
This is a very big advantage. This is because I don’t believe anyone would miss a spot to store their precious generator. But if you do, then an enclosure outside frees up some space in your garage that you can use for other purposes.
What you need for this project
- Measuring tape
- 3 louvered vents (these can be bought cheaply)
- An aluminum sheet
- 1” deck screws
- Bungee cords
- Dremel
- Jigsaw
- 1/4 and ½” machine screws
- Carpentry pencil
- 0.5” Plywood (the size depends on the size of your generator and should be crack free)
- 8 L-Brackets
- Sealant caulk
- 0.5” hardwood railing bars (length you need)
How to build a generator enclosure
1. Design the enclosure
The first step is always to have a sketch of what you want the generator to look like. Any enclosure you build will differ in size depending on the dimensions and build of your generator. In the process, you need to pinpoint the exact features of the generators carefully. Also, you would be able to determine how much material you need for the job.
Besides keeping out rain, the enclosure should also be able to allow air to get into the engine. Additionally, exhaust air and heat should also be allowed to escape. By doing this, the generator is kept safe while not hindering its performance.
You need to mark out points at which the exhaust, cooling fan, temperature monitoring system, vents and any other cool feature you may want to add will be positioned.
When choosing the materials, ensure that you are comfortable working with them. This particular design uses wood since it is much easier to work with. Various vents are provided for efficient cooling of the generator as exhausts are given a safe way out.
Another key consideration you need to make is the inclusion of space allowances in the design. There should not be a too tight fit between the generator and the generator baffle box. Around 2 to 3 inches of allowances should be enough.
2. Building the top panel
Cut out the 0.5-inch plywood with a saw in accordance with the total top dimensions, plus the allowances you had already provided. The remaining front and side panels will be attached to this top panel.
When done, measure and cut out 2 0.5” railing bars to the same dimensions as the top panel. These will run along the length of the top panel. Then cut another two (they do not have to be necessarily equal in length to the other two), but should be shorter. These are of the width.
Attach these railing bars to the top panel using the 1” deck screws. The railing bars will aid in attaching the other panels to the top.
3. Front and side panels
Just for clarity, the front panel is the one that goes to the side at which the engine air intake is. Then the back panel covers the area around the exhaust. The back panel will be constructed differently at a later step.
The side and front panels are, however, constructed in the same way. Basing on the side and front dimensions, cut out three pieces of the plywood (2 sides and 1 front).
On the plywood, measure the size of the louvered vents that you had prepared. Use the carpentry pencil to mark the rectangular outline. The vents will be critical in allowing for air circulation inside the enclosure when the generator is working.
After you have measured and outlined the exact rectangular outline, use the jigsaw to cut the slots. For an easy cutting out, use the Dremel to make holes in the outline and then cut. For neater results, ensure you cut in a straight line. Awkward lines with look horrible.
Once you are done, use the ½ inch screws to fix the vents to the side panels. These machine screws should be firmly fastened in place so that they do not wobble around the generator.
4. Constructing the back panel
The back panel is made a little differently from the rest of the panels. The reason is the intricacies that the exhaust system brings. If you are not careful with the design in a bid to keep out the rain, you may compromise on functionality.
There should be no obstruction whatsoever to the release of exhaust. When it accumulates, the generator may be damaged. And then, the hot fumes are not kind towards the wood. When the muffler gets hot, it burns(chars) the wood with time.
Have the back panel slightly less than half the length of the front panel. The aluminum flashing sheet will occupy the rest of the space. This sheet should be slightly larger than the wood for the back panel.
Fasten the aluminum sheet to the back panel using ¼ inch machine screws. The reason why the sheet is left larger is so that it acts as a canopy against rain. In addition, you can also bend it to allow for the escape of exhaust gases.
5. Assembling all the panels
To fix the four panels to the top panel rail bars, use 1” deck screws. Ensure all the edges are at right angles by using L-shaped brackets at the four corners. Use two brackets for every corner.
When you are done, seal the porous edges sealant caulk. Carpenters glue could work, but it would be too tight in case you need to make adjustments to the design later. The enclosure should be done at this point. You can then try it out on your generator.
To prevent the enclosure from being blown away when the wind is too strong, use bungee cords to wrap it around the generator itself.
Check related products on Amazon:
- Twin chambers: Two separate chambers allow one side to finish composting while leaving the other side available to add fresh wastes; Constant alternation of the two sides will create an uninterrupted stream of nutritious compost
- 360⁰ Tumbling Design: The rotating design prevents you from digging or mixing the pile by hand; And the deep fins on eight panels make it easier to turn the compost bin
- EASY TO ASSEMBLE - The mobile base set includes 4 strong feet(no wheels), what you need to do just to install the connecting rod and the feet. The stand base could be easily assembled with instruction.
- DOUBLE SIZE ADJUSTMENT - With adjustable steel poles and feet, Nefish black appliance base stand can be adjusted from 16 inches to 24-3/8 inches (width and length), from 4 inches to 5.1 inches (heights) fit different appliances and furniture.
- Standby uninterruptible power supply (UPS) with 800VA / 450W battery backup; ideal for desktop computers, home networks, IoT devices, and home entertainment devices
- 12 outlets total (NEMA 5-15R), consisting of 6 surge-protected outlets and 6 surge-protected/battery-backup outlets
- Soundproofing - Acoustic foam panels triangular grooves structure for better noise absorption, helps to reduce and absorb unwanted echoes, waves, reverb and flutter echoes for better recording effect.
- Upgraded Accessory - Additional 270pcs strong double-side adhesive tape is included for free, which helps you finish the installation better and protect your walls from damage. Can be removed easily.
Last update on 2023-12-29 PST / Source: Amazon Affiliates - Details
Modification of this generator baffle box
There are certain additions that you may need to add to this enclosure for more effectiveness. You realize that this design is like a cover that you put over the generator. You can add a palleted bottom panel, with provision for the generator wheels.
The generator would then be wholly covered. With this new design, you can add more features to the baffle box such as a cooling fan, exhaust system, attic vents, fiberglass insulation and a temperature regulation mechanism.
Conclusion
Winter rain and snow should not stop you from enjoying the convenience that your generator will avail to you while camping away from the national power grid. It doesn’t matter whether you are RV camping and therefore using an RV generator or if you are just using these regular generators. How about you build your own portable generator enclosure that can also act as a generator baffle box?
The design provided here is a simple one that aims to primarily keep away rain, let in fresh air and allow for the exit of exhaust gases. Alternative additions can be made to this design to make it more functional.
You may want to be able to monitor the operational temperatures of the generator and also reduce the noise levels. These are optional though.


